Cropping images for the web can be a frustrating art. When cropping with a hard aspect ratio (such as a 16:9 ratio for web images), you have limited power over all variables in the photo frame. Therefore, in order to achieve consistency and harmony when cropping multiple portraits, you have to be selective when choosing which variables to manipulate.
This guide is based on the following four variables:
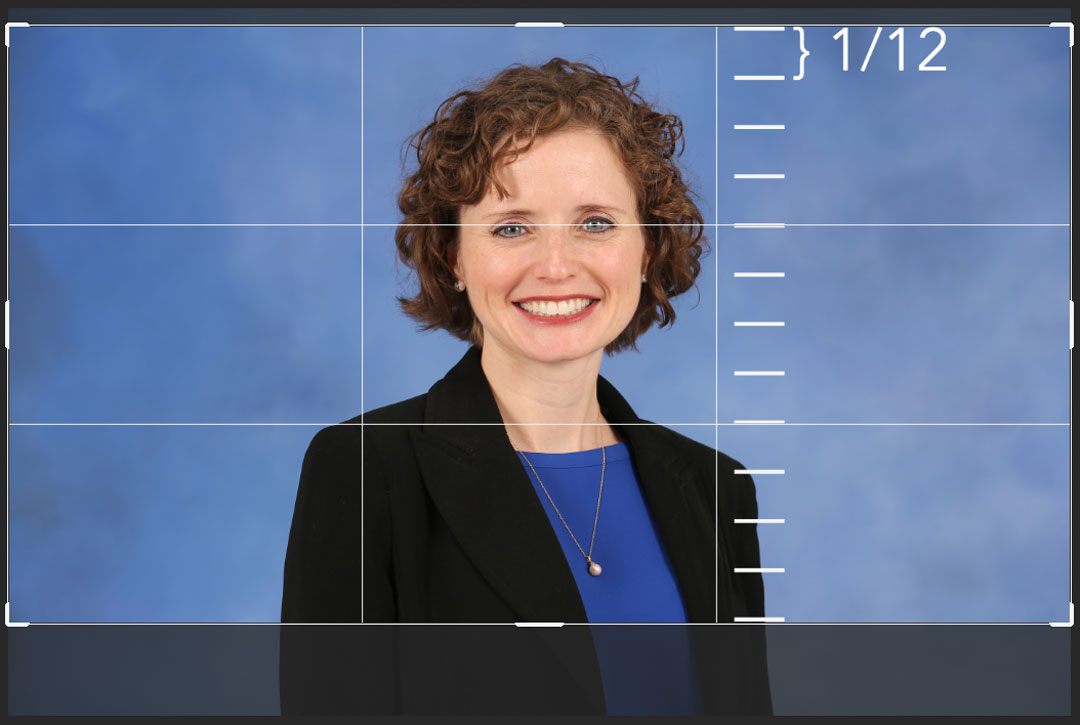
- Aspect ratio. All portraits use the common desktop ratio of 16:9 for website images.
- The rule of thirds. The rule of thirds is the classic rule of photo composition that governs how Adobe Photoshop lays out its white cropping grid. Placing the subject's eyes level with the top gridline creates vertical balance and a provides a baseline of uniformity for all faculty and staff portraits.
- Centering. Placing the line of the subject’s nose in the center of the frame will provide horizontal balance and (mostly) even negative space on either side of the subject’s shoulders.
- Negative space above the subject's head. By dividing the portrait's vertical dimension into twelfths, and giving the space between the top of the head and the top of the frame one twelfth, you ensure that all subjects will sit consistently in the photo frame from portrait to portrait. It also has the secondary effect of cutting off the bottom of the portrait at about the mid-chest, which fits the standard you see in most sculptural busts of classical and neoclassical styles of portraiture.
If you follow these three guidelines for cropping, you will create vertical consistency so that the eyes of each portrait line up and each floats consistently in the frame when arranged in line with other portraits, such as on a faculty directory page.
You will use a cropping tool with a visual cropping grid (such as Photoshop) to crop photos. (If you do not have access to a professional-grade photo editing tool, the OMC has an easy online cropping tool you can use.)
Follow these procedural steps to crop portraits:
- Import the file into Photoshop.
- Click the Crop Tool.
- Set the tool’s ratio to 16 : 9.
- Place the top horizontal line of the cropping grid in line with the subject’s eyes.
- Place the subject directly between the two vertical lines. If the grid had a center line, the subject's nose would be in line with it.
- Allow for approximately 1/12 (5-8%) of the whole frame to show between the top of the subject’s head and the top border:
- Because everybody is different, you will eventually run into a situation where the subject does not fit the crop frame exactly as described above. In those situations, do the best you can as long as the eyes rest close to the top line of the cropping grid. For example, if the subject has a high hair style, you may need to crop the top of the hair off. If the subject has an unusually long neck, you may need to crop the bottom closer to the shoulders than mid-chest at the breastbone.
- Export the cropped photo as a JPG at a resolution of 1440 x 810 px.
- Save your cropped files in a zip file and send them to webmaster@uah.edu. A member of the web team will upload them to faculty and staff database for you so that they appear on the website.